

To keep up with today’s fast-paced development cycles, R&D engineers and scientists need efficient tools to provide answers quickly and free them from routine tasks. COMSOL Multiphysics® has built-in features like parametric sweeps to increase simulation productivity. In addition to graphical modeling, COMSOL offers an Application Programming Interface (API) that you can use to automate any repetitive modeling step. Here’s how to get started with the COMSOL API for use with Java®.
Intro to the COMSOL API
The COMSOL API is an interface to all algorithms and data structures that define a COMSOL model. When you set up a model with the COMSOL Desktop®, you interact with the COMSOL API behind the scenes. LiveLink™ for MATLAB®, the topic of a recent blog post, also operates using the COMSOL API but in an interactive fashion rather than compiled. Today, we focus on the COMSOL API for use with Java®.
COMSOL Desktop as Code Generator
You don’t have to be an expert Java® programmer to get started with the COMSOL API. You can dive right in from the tool you are already working with — the COMSOL Desktop. Each action you perform in this graphical modeling environment gets recorded in the model history. You can export this history as Java code by saving your model and choosing “Model File for Java®” as the file type. This method is useful to create building blocks for your program.
Hello World!
Let’s start with a simple example to get familiar with the process: the COMSOL API version of a “Hello, World!” program.
In the COMSOL Desktop, create a model that only contains a 3D geometry. Add a block to the geometry with dimensions of 0.1m x 0.2m x 0.5m and save a “Model File for Java®” with the name “HelloWorld.java”.
If you open the output in a text editor, it will look like this:
import com.comsol.model.*;
import com.comsol.model.util.*;

public class HelloWorld {

   public static void main(String[] args) {
      run();
   }
   public static Model run() {
      Model model = ModelUtil.create("Model");
      model.modelNode().create("comp1");
      model.geom().create("geom1", 3);
      model.geom("geom1").feature().create("blk1", "Block");
      model.geom("geom1").feature("blk1").set("size", new String[]{"0.1", "0.2", "0.5"});
      model.geom("geom1").run("fin");
      return model;
   }
}
The first two lines are import statements that point to the COMSOL API. This is followed by the definition of the class HelloWorld. The class name is the same as the file name, as is the rule in Java programming.
The class contains a main() method that in turn calls a static run() method to build and return a Model object. For small programming projects, you can directly modify this method. In other words, you don’t necessarily have to use the more advanced object-oriented features of Java.
The Compact History Function
The COMSOL Desktop offers another feature that is useful when generating code: the “Compact History” function in the File menu. When you set up a model, you usually add some features that you later remove or move around. All of these modifications get recorded in the model history, which then holds many unnecessary steps.
The “Compact History” function cleans up the history, removes duplicate and deleted entries, and reorders everything according to the order in the Model Builder. If you use the function before exporting, you will get clean code.
Why not automatically clean up the history before saving a Java® file then? Well, it is sometimes useful not to compact the history.
Suppose you are developing code that uses the COMSOL API and it turns out you need some parts that you can quickly set up with the COMSOL Desktop. You start modifying the model you have been working with and save it as a Java file. Fortunately, you have not compacted the model history before saving and can therefore easily find all the changes right at the end of the exported code. That is much easier than trying to spot changes otherwise scattered throughout the entire model code.
Compiling and Running COMSOL API Code
Java® is a compiled language and before you can do useful things with your code, you have to compile it in a class file. For this you need a Java compiler, such as the free Java® Development Kit (JDK).
Once you have installed a JDK, you can use the
comsolcompile ( comsol compile on Linux® or Mac®)
command, which is part of a COMSOL software installation, to compile your code. The command automatically sets up the path to the COMSOL API for the Java® compiler.
To compile the example above, use the command
comsolcompile -jdkroot PATH_TO_JDK HelloWorld.java
Here, PATH_TO_JDK is the directory where you have installed the JDK. Note that the COMSOL API adheres to Java® 1.5 and the above method works with JDK 1.5 or 1.6.
You can also use an Integrated Development Environment (IDE), such as Eclipse™. Set up your projects with Java 1.5 compatibility and add all JAR files in the “plugins” directory of the COMSOL Multiphysics® installation to your build path.
Once you have compiled your code into a class file, you can open it in the COMSOL Desktop via the File > Open menu. If you do that with the example above, you will see your “Hello World” model with one block in a 3D geometry. The same result can be achieved with a regular COMSOL mph model file. Next, we want to change that and do something beyond the capabilities of a regular model file.
But, before we go ahead and modify the example, let’s examine the structure and meaning of the code in the run() method above.
The COMSOL API in a Nutshell
The “Hello World” example can already teach us some of the most important aspects of working with the COMSOL API. Let’s go through the run() method to understand what’s happening.
The first line,
Model model = ModelUtil.create("Model");
creates a new model with ModelUtil.create(), — a static method that takes a name (the String "Model") as an argument. ModelUtil is the COMSOL API’s little helper, a collection of utility methods. You can use this to load models or create new ones from scratch, for example.
ModelUtil.create()
returns a Model object. This object holds all the settings of a COMSOL model, i.e. it contains the entire model tree that you usually see in the Model Builder of the COMSOL Desktop.
The line
model.modelNode().create("comp1");
creates a new component node in the model tree. A model component has an associated geometry that is added with the line
model.geom().create;("geom1", 3);
The second argument (the numeral 3) makes the component geometry 3D.
Note that the first argument for both create() methods is a String, the so-called tag. Tags are used everywhere in the model object to uniquely identify the features that are contained in the model. This is necessary because a model can contain many features of the same type. You can, for instance, have more than one component in your model, each with its own geometry. The component geometry might contain many primitive shapes of the same type. The physics settings might then use many boundary conditions of the same type, and so on. Thus, giving each item a unique tag is a way of housekeeping.
You can make the tags of any COMSOL Multiphysics model visible in the COMSOL Desktop by enabling the “Show Name and Tag” or “Show Type and Tag” setting in the “Model Builder Node Label” menu of the Home tab.
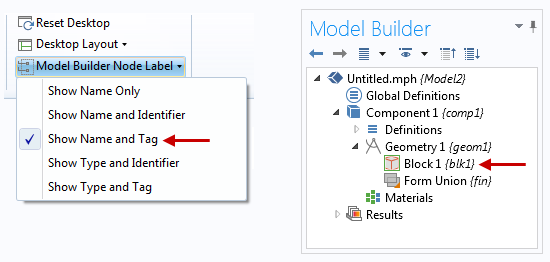
Tags are displayed in the Model Builder of the COMSOL Desktop when the “Show Name and Tag” or “Show Type and Tag” option is selected from the Model Builder Node Label settings.
The next line of code,
model.geom("geom1").feature().create("blk1", "Block");;
creates a block in the first geometry "geom1".
You can recognize the hierarchy of the model tree in this line. The first part, model.geom("geom1") associates the command with geometry "geom1" and the second part, feature().create("blk1", "Block") adds a new feature to it. The feature is a block identified with the tag "blk1". Thinking in terms of the COMSOL Desktop, you can picture the first part as a right-click on "geom1", and the second part as choosing Block from the geometry menu that pops up.
After the block is created, its properties are modified. This happens in the line
model.geom("geom1").feature("blk1").set("size", new String[]{"0.1", "0.2", "0.5"});
Again, the first part identifies the first block "blk1" of "geom1", and the second part modifies the size property with a set() method.
The first argument of the latter specifies the property that you want to change, “size” in this case. The second argument assigns the new values — in this particular case that would be the width, height, and length properties of the block.
Note, that although these properties are set to real numbers, the argument is passed as an array of strings. Why is that? Remember, that in the COMSOL software, you can type in a mathematical expression instead of specific numbers anywhere you want. This is also true for the COMSOL API, and for that reason such properties are passed as strings.
Finally, before the new model is returned, the line
model.geom("geom1").run("fin");
runs the finalization of the geometry, just like when you press the “Build All” button in the COMSOL Desktop.
This is the COMSOL API in a nutshell and all you need to know to get started. There are, of course, many more details, but you can always pick them up as you go along, by using the COMSOL Desktop as a code reference together with the documentation of the COMSOL API for use with Java®.
Example: Building a Spiral Inductor geometry
To illustrate an application of the COMSOL API, we can look at the model of a spiral inductor from our Model Gallery.
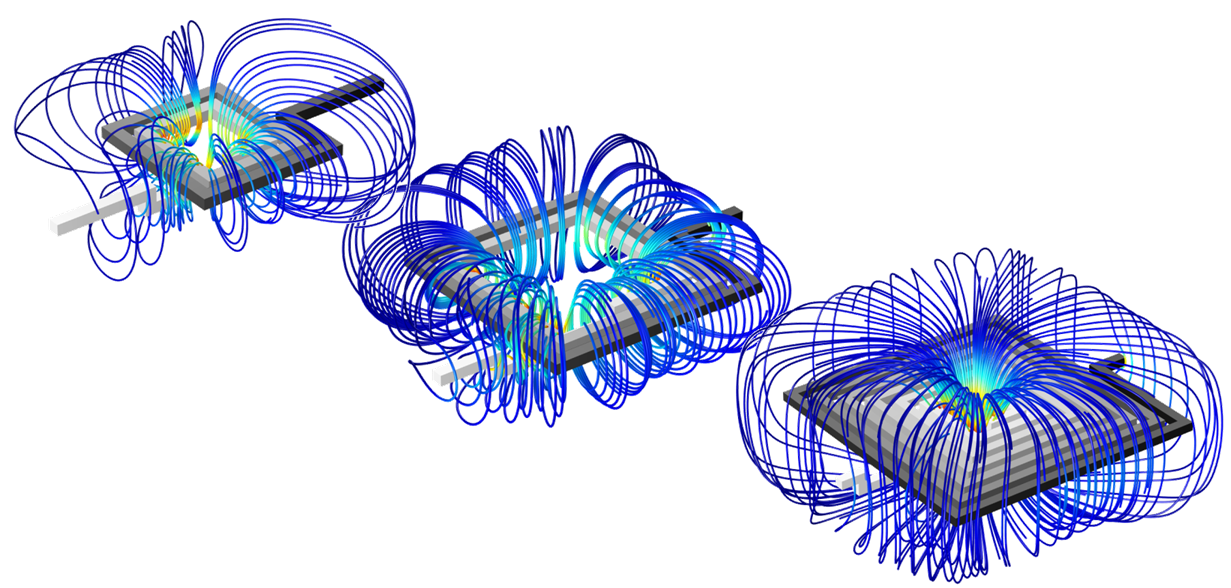
The aim of the model is to compute the self inductance for the given coil design. If you look at the geometry closely, you can see that it is built up from an arrangement of blocks. In the model, the dimensions of the spiral are fixed to particular values. When designing such a device, it is useful to look at different configurations, like inductors with different cross sections and number of windings, for instance. To this end, you can set up the geometry parametrically in the COMSOL Desktop.
Parameterizing the cross section is easy to do there. The number of windings, on the other hand, cannot be parameterized in the COMSOL Desktop, because the length of a piece of wire changes every third turn. As you saw above, however, you can use the COMSOL API to specify all properties of a block in your Java® program. You can use that to build a spiral conductor geometry automatically.
From the “Hello World” example above, you already know how to build one block. To build a spiral conductor, you create many blocks with different size properties and orientations and arrange them in the desired configuration. In the code, you need a couple of variables to keep track of:
| Variable | Code |
|---|---|
| Cross section | ( wire_width and wire_height) |
| Length of a piece of wire | (piece_length) |
| Position | (pos_x and pos_y) |
| Orientation | (rotation_angle) |
| Wire spacing | (inner_spacing and loop_spacing) |
| Number of turns | (n_loop) |
You then generate the blocks that make up the spiral in a loop.
As you now know, you need a unique tag to identify each block. You could create that yourself, by concatenating a block counter to a base string, such as "blk". The better alternative, however, is to use the uniquetag() method provided by the COMSOL API. This method does the same thing, but keeps track of counters internally and makes sure that a tag is not used twice.
In the code snippet below, the tag for each block is generated with
model.geom("geom1").feature().uniquetag("blk")
With the new unique tag, you now create a block and set its properties. Aside from the "size", you also have to change the "pos" and "rot" properties for the position and orientation respectively. After that, you update the variables for the next iteration.
A spiral inductor geometry is generated automatically with the COMSOL API for use with Java®.
What’s Next?
You can use the COMSOL API for many more things than creating geometries, of course. In fact, you can automate any modeling task you normally perform with the COMSOL Desktop. In the example of the spiral inductor, you could, for instance, continue to compute the new result of the updated geometry. You could also run a parametric sweep in your code to compute a whole range of spiral conductors automatically. Then you could proceed to process the results of the computation by creating plots that are exported to image files, extracting the inductance, and exporting all values to a file.
We have merely scratched the surface of the capabilities of the COMSOL API. Beyond programming the tasks you can do manually in the COMSOL Desktop, the COMSOL API gives you access to and control over data structures like the finite element mesh, finite element matrices, and the solution data sets.
Besides writing class files that can be opened by the COMSOL Desktop, you can write programs that connect to a COMSOL Server process or even standalone programs that integrate COMSOL technology. Therefore, if you routinely deal with a particular simulation task, the COMSOL API is a powerful and flexible tool for you to automate that task.
Eclipse is a trademarks of Eclipse Foundation, Inc. Linux is a registered trademark of Linus Torvalds. Mac is a trademark of Apple Inc., registered in the U.S. and other countries. MATLAB is a registered trademark of The MathWorks, Inc. Oracle and Java are registered trademarks of Oracle and/or its affiliates.


Comments (7)
Oana Tucaliuc
April 13, 2015Hello,
This is a very nice demonstation but I ran into problems trying to compile through Netbeans (I guess similar to Eclipse). First I checked that I can compile a java file into a class using “C:\Program Files\…\comsolcompile” -jdkroot “C:\Program Files\Java\jdk1.8.0_40” “…\feeder_clamp.java” with both JDK 8 and 7. Importing the jar files in the comsol plugin folder and running from Netbeans fails with the first message:
java.io.IOException: javax.crypto.IllegalBlockSizeException: Input length must be multiple of 16 when decrypting with padded cipher
with or without ModelUtil.initStandalone(false); in the main() function. My question is: do we need to pass the control to comsolcompile.exe at runtime or the two basic import statements (for geometry only)
import com.comsol.model.*;
import com.comsol.model.util.*;
should be enough and the error is elswhere. Do we need to register the JDK 1.5 or 1.6 platform with Netbeans, if the file compiles with JDK 8 manually though the command line in Windows?
Thanks!
Oana Tucaliuc
April 13, 2015Solved starting the comsol server. thnaks!
Peter Lane
June 16, 2015Oana Tucaliuc, could you describe what you did to get this working. I am running into the exact same issue, but running the comsol server doesn’t help. Thanks!
Oana Tucaliuc
October 13, 2015Helo Peter,
In the end I gave up compiling through Netbeans. I simply compile the java file directly on the windows machine through cmd and it produces the java class. If you need help, send me your model and a description of what would like to do, at this email cbontoiu@gmail.com Cheers!
Amruth Chundi
May 23, 2017Hey..
I wanted to know what all can we do using JAVA Compiler for COMSOL.
I want to simulate Additive Manufacturing in which I have to make the program add the material layer by layer continuously. Is it possible using JAVA?
Thanks.
Thorsten Koch
May 24, 2017Hello Amruth,
there are certainly many options you have with the COMSOL API and working with it is now much easier through the COMSOL Application Builder. I suggest you browse through the “Applications” category here in the blog for more ideas. And if you have detailed questions feel free to reach out to support@comsol.com.
Good Luck!
Thorsten
Amanda Chua
July 29, 2018Great information. Since last week, I am gathering details about java experience. There are some amazing details on your blog which I didn’t know. Good.