Problem Description
This solution describes how you enable distributed parallelization (cluster jobs) in COMSOL Multiphysics®.
Solution
COMSOL supports two mutual modes of parallel operation: shared-memory parallel operations and distributed-memory parallel operations, including cluster support. This solution is dedicated to distributed-memory parallel operations. For shared-memory parallel operations, see Solution 1096.
COMSOL can distribute computations on compute clusters using MPI. One large problem can be distributed across many compute nodes. Each compute process gets assigned parts of the data and parts of the total workload. This lowers the memory footprint per host, gives more total accumulated memory, and speeds up the simulation time for sufficiently large models. Also, parametric sweeps can be distributed with individual parameter cases distributed to each cluster node.
Cluster computing is supported on Windows® (Windows® Server 2012 R2/2016/2019/2022/2025, or on a workstation with Microsoft MPI), and on Linux® using SLURM®, PBS, or Open Grid Scheduler / Grid Engine (OGS/GE, based on Sun Grid Engine). Other common schedulers, such as LSF, can be utilized by configuring the General scheduler type in the COMSOL Desktop® (using an additional wrapper script; see below) or by creating a job submission script for batch submission from the command line.
NOTE: A Floating Network License (FNL) is required to run COMSOL Multiphysics® with distributed memory parallelization (cluster/cloud computing).
In the following sections, you find information and additional links on how to get started with cluster computing as well as useful tips and troubleshooting guides.
Modes of Cluster Operation
Cluster computations with COMSOL Multiphysics® can be set up and launched in the following modes of operation:
Remote from the GUI : The easiest way of running COMSOL Multiphysics® on a cluster is to run it from the GUI. The GUI can be launched on a local desktop, on a workstation, or on the cluster itself, and it is used for setting up the model. The Cluster Computing node or the Cluster Sweep node can be used in your study to configure and launch the parallel execution on a remote cluster or on the same local machine. When the distributed external job is done, the solution data is stored in the specified output file(s). On the Cluster Sweep node, you can select the option Synchronize solutions in order to have the parametric solutions available in the local GUI for postprocessing. See How to Run on Clusters from the COMSOL Desktop Environment for a description of how to set up a study for distributed computing and how to configure the cluster access. Settings for a job scheduler on the remote cluster can be applied in the GUI (SLURM® is used in the referenced example).
Cluster batch calls from the command line: The GUI-based cluster computing approach might be infeasible for huge models, if big data needs to be transferred, if the job is executing for a long time, if the computation starts at a much later point (the scheduler on a multiuser cluster may delay the job execution), or if there is no GUI available. In these cases, you can launch your cluster job as a batch command from the command line. There is no Cluster Computing node or Cluster Sweep node required in your study for a distributed run from the command line (these nodes are even ignored if present). The mechanism for launching a distributed batch job is similar to the one described on How to Run Simulations in Batch Mode from the Command Line. For further details see the instructions below. If your cluster is controlled by a scheduler like SLURM®, PBS, OGS/GE, HPCS (Microsoft HPC Pack), or LSF, the COMSOL batch commands need to be wrapped by a submission script.
In a distributed GUI instance: If the cluster is not controlled by a scheduler, you can launch an interactive GUI session with distributed cluster instances. This gives the same look and feel like running the COMSOL Multiphysics® GUI on a standard PC or workstation. A Cluster Computing or Cluster Sweep node is not required for parallel execution of the studies.
Client-Server mode: The COMSOL Client-Server mode for the COMSOL Multiphysics® product (not to be confused with COMSOL Server™) can also be used for a distributed COMSOL Multiphysics® Server. See Getting the Most out of Client-Server Mode for an introduction into this mode of operation. On a cluster, a distributed COMSOL Multiphysics® Server can be started with the COMSOL command line arguments (see the details below) and you connect to the distributed Multiphysics Server from a remote GUI acting as client.
COMSOL Server™: Distributed batch jobs can be launched from an app running on a COMSOL Server™. The app needs to implement a Cluster Computing or Cluster Sweep node in the relevant studies. The batch jobs can be executed in distributed mode on a cluster. There needs to be a COMSOL Server™ installation on the cluster, but the COMSOL Server instance may run on a different computer.
Cloud Computing: The benefits of cluster computing can also be achieved by running on cloud computing hardware. For additional information, including a list of cloud vendor partners who can help get you set up quickly and easily, see Running COMSOL® Multiphysics and COMSOL Server™ in the Cloud and Cloud Partners.
Fundamentals
The following terms occur frequently when describing the hardware for cluster computing and shared memory parallel computing:
- Host: The host is a physical machine with a network adapter and unique network address. A cluster consists of multiple hosts connected by a network. A host is sometimes referred to as a physical node.
- Compute node: The compute nodes are where the distributed computing occurs. A COMSOL instance resides in each compute node and communicates with other compute nodes using MPI. A compute node is a process running on the operating system, and multiple compute nodes can be assigned to run on a single host.
- Core: One or more physical processor cores are used in shared-memory parallelism by a computational node running on a host with a multicore processor. For example, a host with two quad-core processors has eight available cores.
The following settings are particularly important to specify how COMSOL executes a cluster job on distributed memory hardware:
- Number of nodes: The total number of compute nodes created across all hosts when the cluster job is executed. This is then also the number of active MPI processes.
- Host file: The host file is a plain text file that contains the IP address or hostname of each host. A properly configured host file for COMSOL should have each IP address listed only once, with each entry on a separate line.
- Number of processes on a host: The number of compute nodes that will run on each host.
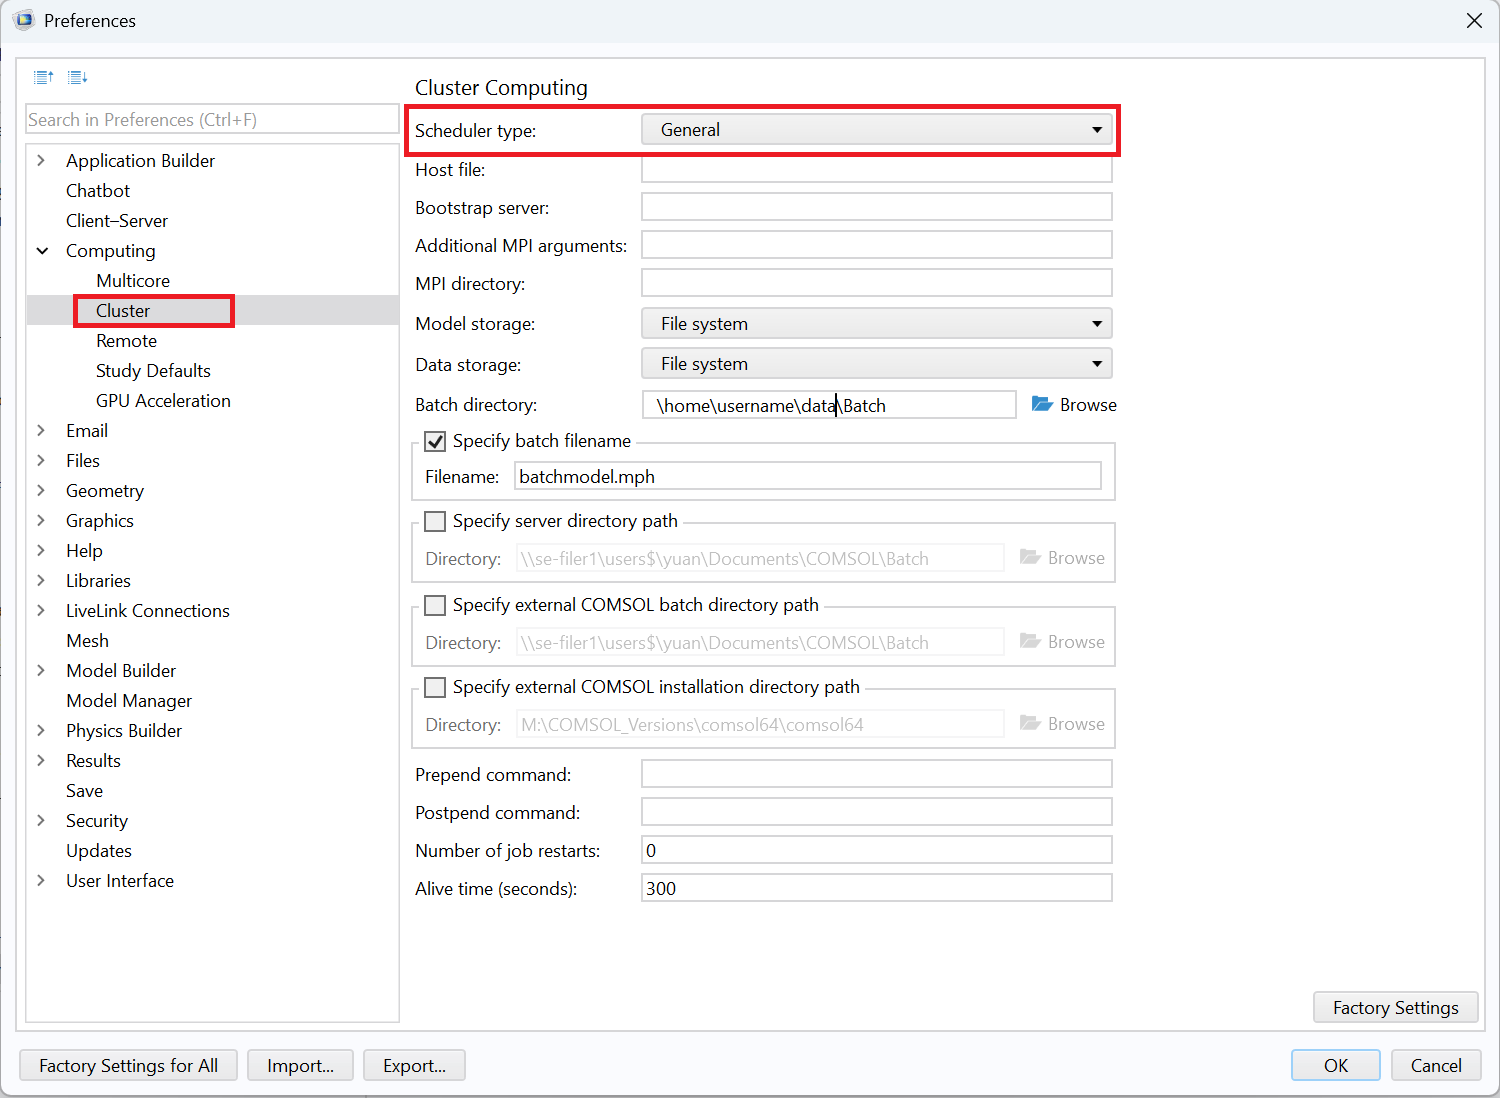
The settings for Number of nodes and Number of processes on a host can be found in the Cluster Computing or Cluster Sweep nodes and on the associated nodes under the Job Configurations node in the COMSOL GUI. The Host file can be set in the Preferences under Multicore and Cluster Computing:
Similar settings can be provided as execution arguments when running a noninteractive session of COMSOL from the command line:
-nn <no. of nodes>| Total number of compute nodes-f <path/hostfile>| Path and file containing the list of hostnames-nnhost <no. of nodes per host>| Number of compute nodes to run on each host-np <no. of cores>| Number of cores to be used by each compute node
Getting started with the command line
A quick way to get started with COMSOL cluster computing is to run a job directly from the command line. For this you need access to a cluster where you have the ability to log into one of the hosts and execute commands. One of the simplest examples is a Beowulf cluster built from normal workstation computers, as described in Building a Beowulf Cluster for Faster Multiphysics Simulations.
For these examples, assume the system consists of four hosts, each with eight cores. In the first example, the input file example.mph could be any COMSOL file to be run distributed across the four hosts. The most common reason for this would be that the solver requires too much memory to be run on a single host. The following Linux® operating system execution line will create four compute nodes, with one running on each host whose IP address or hostname is listed in hostfile. Each compute node will use all eight cores available on the host.
comsol batch -nn 4 -nnhost 1 -np 8 -f hostfile
-inputfile example.mph
-outputfile example_solved.mph -batchlog logfile.log
As a second example, the input file example.mph could be any COMSOL model file with a parametric sweep where solving for each parameter value can be done on a single machine. Distributing the sweep on a cluster allows it to be solved faster. When preparing the model, go to the Parametric Sweep node, turn on Advanced Study Options in the View menu at the top of the Model Builder window, and under the Study Extensions settings select the Distribute parametric sweep check box. This configures the COMSOL scheduler to run each parameter value on a different compute node. Using the same Linux® command from the first example would run four parameters at the same time, one on each host. If the sweep has more than four parameters, then when a compute node finishes solving for one parameter it will automatically start on another until they are all solved.
For some parametric sweeps, such as relatively small models solved for many parameters, it may be beneficial to assign more than one computational node to each host. The following Linux® command will create eight compute nodes, with two running on each of the four hosts listed in hostfile. Each compute node is assigned four cores, since two compute nodes need to share the eight cores available on a host.
comsol batch -nn 8 -nnhost 2 -np 4 -f hostfile
-inputfile example.mph
-outputfile example_solved.mph -batchlog logfile.log
The potential benefit of running multiple parameters simultaneously on a single host is discussed in the blog article Hybrid Computing: Advantages of Shared and Distributed Memory Combined.
Cluster distribution in an interactive COMSOL® session
Another way to run cluster jobs is to add a Cluster Computing or Cluster Sweep node to a study. This is done by right-clicking the Study node (the Advanced Study Options must be enabled). The Cluster Computing interface distributes the work of the study across all hosts, similar to the first example above. The relevant settings, such as the number of nodes, the host file, and the number of simultaneous jobs, can be applied on the Cluster Computing or Cluster Sweep node. See How to Run Clusters from the COMSOL Desktop® Environment for a detailed description of the possible settings.
The Cluster Sweep interface is similar to running a distributed parameter sweep, as described in the second example above. It has additional settings for synchronization of the solution data or accumulated probe tables across the parameter cases. A description of how to set up and use the Cluster Sweep node is given in the blog How to use the Cluster Sweep node in Comsol Multiphysics®.
Example models for cluster computing included in the Application Library:
COMSOL_Multiphysics/Tutorials/micromixer_cluster Demonstrates how the Cluster Computing interface can be used to distribute the work of running a single model to several nodes. If the COMSOL session is running on one of the cluster hosts, then the built-in COMSOL scheduler is used by changing the setting "Scheduler type" to "General", specifying the number of nodes, and providing the path to the host file.
COMSOL_Multiphysics/Tutorials/thermal_actuator_jh_distributed Demonstrates how the Cluster Computing interface can be used with a distributed parametric sweep to have each node run a different parameter. This functionality can also be implemented by replacing the Cluster Computing and Parametric Sweep with a Cluster Sweep, which has additional options for file handling and greater resilience to failure of an individual node.
Joule Heating of a Microactuator - Distributed Parameter Version
Launching a GUI cluster instance
You can launch a GUI cluster instance (in non-batch mode) by invoking, e.g.
comsol -nn 8 -nnhost 2 -np 4 -f hostfile
All computations in the GUI are run in distributed mode and there is no need for a Cluster Computing or a Cluster Sweep node in the corresponding studies. Note that this approach is not working on a scheduler controlled cluster or if there is no GUI available due to the system's policies.
On a (multicore-/multi-socket) Windows computer with Microsoft MPI installed you can launch a GUI cluster instance by calling, e.g.
mpiexec -n 2 comsolcluster.exe -np 2
which gives you two compute nodes running with two threads (which would be suitable for a quad-core processor).
Launching a distributed COMSOL Multiphysics® Server
A distributed COMSOL Multiphysics® Server can be launched, for example with the command
comsol mphserver -nn 8 -nnhost 2 -np 4 -f hostfile
When another COMSOL Multiphysics instance is launched (on the same or on another machine) and connected as a client to the Multiphysics® Server, all computations are executed in the specified parallel environment.
Reading the batch log and the solver log
It is always good practice to read the solver log (in an interactive run from the GUI) or the batch log (from a batch run). The output tells you the host names where the processes are started, how many compute processes (nodes) are used, and gives you information about the processors, the sockets, and the number of cores used.
When COMSOL is starting up you find the information similar to
Node 0 is running on host: cluster0
Node 0 has address: cluster0.myinst.com
Node 1 is running on host: cluster1
Node 1 has address: cluster1.myinst.com
...
The Messages window in the GUI informs you with a message similar to
Running in distributed mode using 8 nodes
The solver log in the Log window or the batchlog file details the processor and core information for all compute nodes in terms of
...
<<<<< Node 1 <<<<<<<<<<<<<<<<<<<<<<<<<<<<<<<<<<<<<<<<<<<<<<<<<<<<<<<<<<<<<<<<<<<
Running in distributed mode using 8 nodes.
Running on 2 x Intel(R) Xeon(R) Gold 6132 CPU at 2.60 GHz.
Using 2 sockets with 28 cores in total on cluster1.myinst.com.
...
The line <<<<< Node 1 <<< ... is specifying the node that outputs the next following lines. The first line following is global information emitted by all nodes, and the last two lines are local information specific to the current node.
NOTE: Please note that COMSOL does not benefit from hyperthreading. The total number of cores used by the processes on a specific host should not exceed the number of physical cores on that host. Check the logs for warnings in case of an overassignment. If your processor supports hyperthreading, it should always be enabled though, such that other applications can take advantage of it.
Submitting directly to a job scheduler
If your cluster is controlled by a job scheduler, you can add scheduler-specific commands to your call. On a SLURM® cluster, the launch command may look
sbatch -N 4 --ntasks-per-node=2 --export=FLROOT=${COMSOL_INSTALL_PATH}
${COMSOL_INSTALL_PATH}/bin/comsol batch -mpibootstrap slurm -nnhost 2
-inputfile ${MODEL_PATH}/input.mph -outputfile ${MODEL_PATH}/output.mph
-batchlog ${MODEL_PATH}/job.log
The SLURM option -N is setting the number of physical hosts and the option --ntasks-per-node is setting the number of compute nodes per physical host. The COMSOL option -mpibootstrap slurm instructs COMSOL to deduce the COMSOL specific parameter -nn from the SLURM environment (the value for the number of threads -np will be set automatically to the optimal value, that is using all available resources). In the example above, we get -nn 8 and -nnhost 2. The system variable FLROOT needs to be set to the COMSOL installation path (given by the variable COMSOLINSTALLPATH set by the user, for example to /usr/local/comsol64/multiphysics, in this example). The variable MODEL_PATH needs to be set as well.
Using job submission scripts
If the jobs on your cluster are managed by a scheduler, you can use the predefined GUI interface for the supported schedulers (Microsoft HPC Pack, SLURM®, PBS, OGS/GE). For using unsupported schedulers (like, for example LSF), you can configure the scheduler type General and call a wrapper script on the cluster from the GUI (see below).
For launching the scheduler-controlled cluster job locally, the COMSOL batch commands can be wrapped into a job submission script. When launching COMSOL from the command line, you specify the total number of compute processes via the option -nn (i.e. the total number of MPI processes) and the number of compute processes per host via the option -nnhost. In contrast, many schedulers, such as SLURM, expect the total number of physical hosts as an input argument and you need to adjust the expected settings accordingly. The total number of compute processes (to be specified for COMSOL via -nn) is given by the number of physical hosts (specified for SLURM® via -N or --nodes) times the number of tasks per host (specified for SLURM® via --ntasks-per-node, specified for COMSOL via -nnhost). Beside additional settings, the job submission script has to translate between the desired COMSOL options and the scheduler's options.
You find a collection of example submission scripts below.
Example of a SLURM® job submission script
#!/bin/bash
# slurmsubmit.sh

#SBATCH --nodes=4
#SBATCH --ntasks-per-node=2
#SBATCH --job-name="COMSOL"
#SBATCH --mem="8000"
#SBATCH --time="04:00:00"
#SBATCH --partition="general"
#SBATCH --mail-type=all
#SBATCH --mail-user="${USER}@domain.com"
#SBATCH --exclusive
#SBATCH --account="${USER}"
#SBATCH -D "/srv/data/comsol64/bin"
#SBATCH -o "${HOME}/logs/slurm.out"
#SBATCH -e "${HOME}/logs/slurm.err"

MODELTOCOMPUTE="mymodel.mph"
INPUTFILE="${HOME}/input/${MODELTOCOMPUTE}"
OUTPUTFILE="${HOME}/output/${MODELTOCOMPUTE}"
BATCHLOG="${HOME}/logs/${MODELTOCOMPUTE}.log"

# COMSOL command, using -nn 8 and -nnhost 2 deduced from SLURM
./comsol batch -mpibootstrap slurm -inputfile ${INPUTFILE} -outputfile ${OUTPUTFILE} \
-batchlog ${BATCHLOG} -alivetime 15 -recover -mpidebug 10
Launch job with sbatch slurmsubmit.sh.
Example of OGS/GE job submission script
#!/bin/bash
# ogssubmit.sh

#$ -b y
#$ -pe "cluster" 8
#$ -wd "/srv/data/comsol64/bin"
#$ -o "${HOME}/logs/ogs.out"
#$ -e "${HOME}/logs/ogs.err"

MODELTOCOMPUTE="mymodel.mph"
INPUTFILE="${HOME}/input/${MODELTOCOMPUTE}"
OUTPUTFILE="${HOME}/output/${MODELTOCOMPUTE}"
BATCHLOG="${HOME}/logs/${MODELTOCOMPUTE}.log"

./comsol batch -nn '${NHOSTS}' -nnhost 1 \
-inputfile ${INPUTFILE} -outputfile ${OUTPUTFILE} -batchlog ${BATCHLOG} \
-recover -alivetime 15
Launch job with qsub ogssubmit.sh.
Example of PBS job submission script
#!/bin/bash
# pbssubmit.sh

#PBS -V
#PBS -l nodes=4:ppn=2
#PBS -j oe
#PBS -N "COMSOL"
#PBS -q "standard"
#PBS -d "/srv/data/comsol64/bin"
#PBS -o "${HOME}/logs/pbs.out"
#PBS -e "${HOME}/logs/pbs.err"
#PBS -l walltime="04:00:00"
#PBS -m abe
#PBS -M "${USER}@myinst.com"

./comsol batch -mpirmk pbs -job b1 -alivetime 15 -recover \
-inputfile "${HOME}/input/mymodel.mph" -outputfile "${HOME}/out/mymodel.mph" \
-batchlog  "${HOME}/logs/mymodel.mph.log"
Launch job with qsub pbssubmit.sh.
Example of LSF job submission script
#!/bin/bash
# lsfsubmit.sh

#BSUB -r
#BSUB -t "04:00:00"
#BSUB -J "comsoltest"
#BSUB -q "general"
#BSUB -cwd "/srv/data/comsol64/bin"
# Set total number of compute cores, n = nn*np = 32
#BSUB -n 32
# Use np = 8 cores per node
#BSUB -R "span[ptile=8]"
#BSUB -R "rusage[resmem=8000]"
#BSUB -o "${HOME}/logs/comsol_lsf.log"

MODELTOCOMPUTE="mymodel.mph"
INPUTFILE="${HOME}/input/${MODELTOCOMPUTE}"
OUTPUTFILE="${HOME}/output/${MODELTOCOMPUTE}"
BATCHLOG="${HOME}/logs/${MODELTOCOMPUTE}.log"

# Launch the COMSOL batch job with -nn 4 -nnhost 1 -np 8 derived from LSF
./comsol batch -mpibootstrap lsf -inputfile ${INPUTFILE} -outputfile ${OUTPUTFILE} \
-batchlog ${BATCHLOG}
Launch job with bsub lsfsubmit.sh.
Example of an HPCS job file in xml format
<?xml version="1.0" encoding="utf-8"?>
<Job IsExclusive="true" Owner="myname" UserName="myname" JobType="Batch"
     Priority="Normal" MinNodes="2" MaxNodes="2">
    <Dependencies/>
    <Tasks>
        <Task WorkDirectory="\srv\data\comsol64\bin\win64"
              CommandLine="mpiexec.exe comsolclusterbatch.exe
              -inputfile "\home\myname\input\batchmodel.mph"
              -batchlog "\home\myname\output\batchmodel.mph.log"
              -prefsdir "\home\myname\data\comsol\prefs" -recover"
              StdOutFilePath="\home\myname\output\batchmodel.mph.out"
              StdErrFilePath="\home\myname\output\batchmodel.mph.err"
              MinNodes="2" MaxNodes="2"/>
    </Tasks>
</Job>
Wrapper scripts
When configuring an unsupported scheduler from the GUI, a wrapper script on the remote side needs to be used that is called from the local GUI. The structure of the call is (if to be executed on the remote machine): ssh command - wrapper script - COMSOL command. The wrapper script takes the COMSOL command as input and extracts the settings for -nn, -nnhost, -np from the COMSOL command and translates them into a job submission call.
You can set the wrapper script in the field Prepend command under Preferences / Multicore and Cluster Computing or on the Cluster Computing node under Job Configurations:

A wrapper script wrapper.sh for SLURM® may look like
#!/bin/bash
# wrapper.sh

COMSOL_COMMAND=$*
# parse arguments: -np, -nn, -nnhost
while [ $# -gt 0 ]; do
    case "$1" in
        -np)
            shift
            NP=`sh -c "echo $1"`
            shift
            ;;
        -nn)
            shift
            NN=`sh -c "echo $1"`
            shift
            ;;
        -nnhost)
            shift
            NNHOST=`sh -c "echo $1"`
            shift
            ;;
        *)
            shift
            ;;
    esac
done

NNODES=${(((${NN}+${NNHOST}-1)/${NNHOST}))}

# call sbatch
sbatch --nodes=${NNODES} --ntasks-per-node=${NNHOST} --job-name="COMSOL" \
--mem="8000" --time="04:00:00" --partition="general" \
--exclusive --account="${USER}" -D "/srv/data/comsol64/bin" \
-o "${HOME}/logs/slurm.out" -e "${HOME}/logs/slurm.err" \
${COMSOL_COMMAND}
See Also
For additional information on how COMSOL uses shared-memory parallelism on multicore computers, see COMSOL and Multithreading.
Hardware Recommendations
See the Knowledge Base solution on Selecting hardware for clusters.
Troubleshooting
Your first step is to make sure you have the latest version installed. The latest version can be downloaded here. Also do Help > Check for Updates to install the latest software updates. The latest updates are also available for download here.
Error messages relating to GTK on Linux®
GLib-GObject-WARNING **: invalid (NULL) pointer instance
GLib-GObject-CRITICAL **: g_signal_connect_data: assertion `G_TYPE_CHECK_INSTANCE (instance)' failed
Gtk-CRITICAL **: gtk_settings_get_for_screen: assertion `GDK_IS_SCREEN (screen)' failed
...
These errors typically occur when the COMSOL® user interface Java® component is trying to display an error message in a graphical window, but there is no graphical display available. The error indicates a problem during the startup of the Eclipse runtime in the COMSOL configuration directories. You can check for log files of the form .comsol/v61/configuration/comsol_*.ini configuration files in a text editor:
/usr/local/comsol64/multiphysics/bin/glnxa64/comsolcluster.ini
/usr/local/comsol64/multiphysics/bin/glnxa64/comsolclustermphserver.ini
/usr/local/comsol64/multiphysics/bin/glnxa64/comsolclusterbatch.ini
and locate the lines
-Dosgi.configuration.area=@user.home/.comsol/v61/configuration/comsol_@process.id
-Dosgi.instance.area=@user.home/.comsol/v61/workspace/comsol_@process.id
If you are using a roaming profile or a network based filesystem, the problem might be fixed by using file locations on the local machine instead. The suffix _@process.id is important to avoid conflicts between different processes. If you do not have write permissions in the installation folder, the modified *.ini files can be placed into a user defined directory and the path can be handed over via the -comsolinifile flag when launching COMSOL. As an alternative to modifying the *.ini-files, you can use the -configuration and -data flags on startup. Note that the paths for configuration and workspace should not point to existing directories with important data as the directories might be cleared.
Check that the nodes can access the license manager
Linux®: Log in to each node and run the the command
comsol batch -inputfile /usr/local/comsol64/multiphysics/applications/COMSOL_Multiphysics/Equation_Based/point_source.mph -outputfile out.mph
The command above should be issued on one line. /usr/local/comsol64 is assumed to be your COMSOL installation directory. The /usr/local/comsol64/multiphysics/bin directory, where the comsol script is located, is assumed to be included in the system PATH. Make sure you have write permissions for ./out.mph. No error messages should be produced, or you may have a license manager connectivity problem.
Windows® HPCS: Log in to each node with remote desktop and start the COMSOL Desktop GUI. No error messages should be displayed.
Issues with Infiniband based Linux® clusters
Update the Infiniband drivers to the latest software version. If you cannot update at this time, add the command-line option -mpiofiprovider tcp. This will use TCP for communication between nodes.
For more information advice on how to troubleshoot Infiniband issues, please refer to the section Troubleshooting Distributed COMSOL and MPI in the COMSOL Multiphysics Reference Manual.
Problems with the Cluster Computing feature in the model tree
If you get the error message "Process status indicates that process is running", it means that the *.status file in the batch directory indicates that the previous job is still running. In some cases this can happen even if the job is not actually running, for example if the job halted or was terminated in an uncontrolled way. To work around this problem, perform these steps:
- Cancel any running jobs in the Windows® HPCS Job manager or other scheduler that you use.
- In COMSOL, go to the External Process page at the bottom-right corner of the COMSOL Desktop.
- Click the Clear Status button. If the error still remains, manually delete all the files in the batch directory.
Error messages due to communication problems between Linux® nodes
If you get error messages, make sure that the compute nodes can access each other over TCP/IP and that all nodes can access the license manager in order to check out licenses. If you run the ssh protocol between the hosts on a Linux cluster you need to pregenerate the keys in order to prevent the nodes to ask each other for passwords as soon as communication is initiated:
# generate the keys
ssh-keygen -t dsa
ssh-keygen -t rsa
# copy the public key to the other machine
ssh-copy-id -i ~/.ssh/id-rsa.pub user@hostname
ssh-copy-id -i ~/.ssh/id-dsa.pub user@hostname
Error messages due to communication problems when using PBS
If you are using PBS as scheduler, you may see this message in the PBS error log when running a job on multiple nodes:
[mpiexec@clusternode] check_exit_codes (../../../../../src/pm/i_hydra/libhydra/demux/hydra_demux_poll.c:117): unable to run bstrap_proxy on sgscccpu0900.in623.corpintra.net (pid 80874, exit code 256)
[mpiexec@clusternode] poll_for_event (../../../../../src/pm/i_hydra/libhydra/demux/hydra_demux_poll.c:159): check exit codes error
[mpiexec@clusternode] HYD_dmx_poll_wait_for_proxy_event (../../../../../src/pm/i_hydra/libhydra/demux/hydra_demux_poll.c:212): poll for event error
[mpiexec@clusternode] HYD_bstrap_setup (../../../../../src/pm/i_hydra/libhydra/bstrap/src/intel/i_hydra_bstrap.c:1061): error waiting for event
[mpiexec@clusternode] HYD_print_bstrap_setup_error_message (../../../../../src/pm/i_hydra/mpiexec/intel/i_mpiexec.c:1027): error setting up the bootstrap proxies
[mpiexec@clusternode] Possible reasons:
[mpiexec@clusternode] 1. Host is unavailable. Please check that all hosts are available.
[mpiexec@clusternode] 2. Cannot launch hydra_bstrap_proxy or it crashed on one of the hosts. Make sure hydra_bstrap_proxy is available on all hosts and it has right permissions.
[mpiexec@clusternode] 3. Firewall refused connection. Check that enough ports are allowed in the firewall and specify them with the I_MPI_PORT_RANGE variable.
[mpiexec@clusternode] 4. pbs bootstrap cannot launch processes on remote host. You may try using -bootstrap option to select alternative launcher.
In this case, try adding the option -mpibootstrap ssh to the COMSOL command.
COMSOL makes every reasonable effort to verify the information you view on this page. Resources and documents are provided for your information only, and COMSOL makes no explicit or implied claims to their validity. COMSOL does not assume any legal liability for the accuracy of the data disclosed. Any trademarks referenced in this document are the property of their respective owners. Consult your product manuals for complete trademark details.